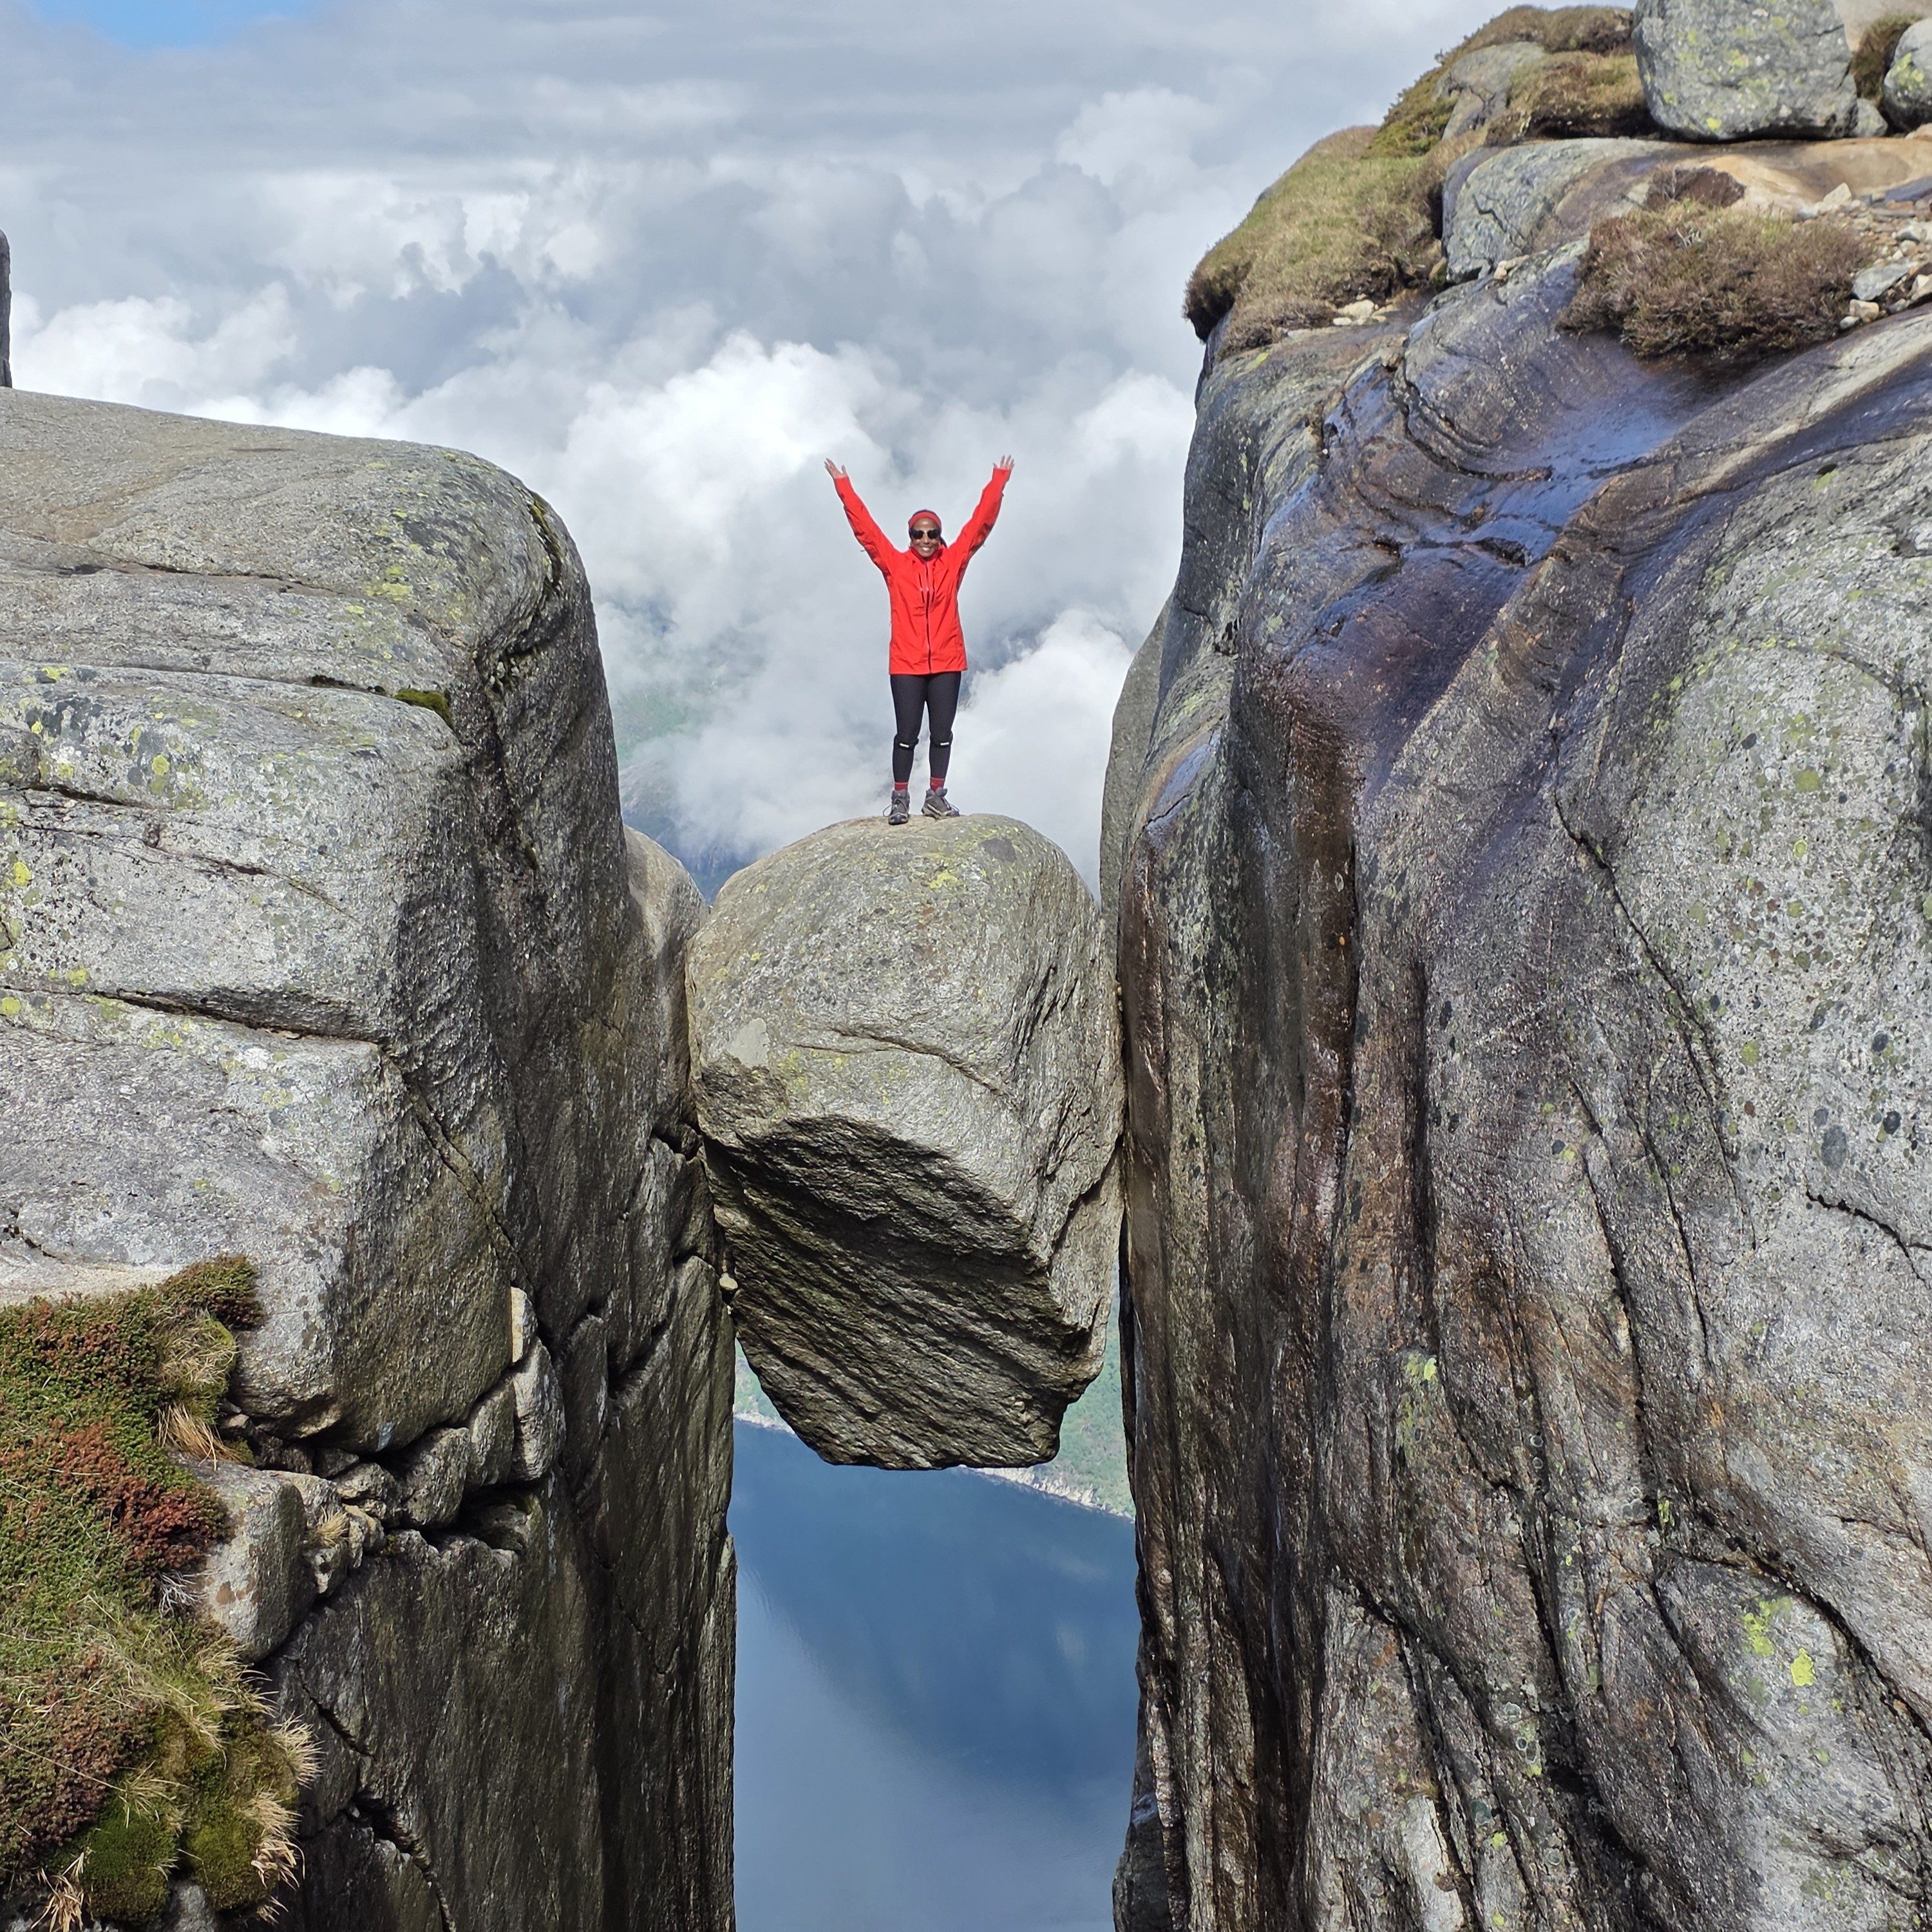
Hiking to Kjeragbolten was one of the highlights of my trip to Norway, but it was also one of the hikes I was most nervous about beforehand. Famous for the enormous boulder wedged between two cliffs almost 1,000 meters above Lysefjord, Kjeragbolten looks intimidating and parts of the trail certainly deserve to be taken seriously. However, I found most of the Kjeragbolten hike surprisingly manageable. The biggest challenge for me was the steep sections where you have to use chains to help pull yourself up and control your descent. If you’re planning to hike Kjeragbolten for the first time, this guide covers everything you need to know, including how difficult the hike really is, what the trail is like, how long it takes, and what to expect when you finally reach the famous Kjerag boulder.
Note – This post contains affiliate links. When you make a purchase using one of these affiliate links, I get paid a small commission at no extra cost to you.
Table of Contents
- Kjeragbolten Hike at a Glance
- Where Is Kjeragbolten?
- How to Get to the Kjeragbolten Trailhead
- What Is the Kjeragbolten Hike Actually Like?
- How Difficult Is the Kjeragbolten Hike?
- How Long Does the Kjeragbolten Hike Take?
- Stepping Onto Kjeragbolten
- My Kjeragbolten Hike Experience
- What to Wear and Bring for the Kjeragbolten Hike
- Best Time to Hike Kjeragbolten
- What Weather Do You Need for Kjeragbolten?
- Tips for Hiking Kjeragbolten for the First Time
- Is the Kjeragbolten Hike Worth It?
- Kjeragbolten Hike FAQs
- How long is the Kjeragbolten hike?
- Is the Kjeragbolten hike difficult?
- Do you need to use chains on the Kjeragbolten hike?
- Do you have to stand on Kjeragbolten?
- Is Kjeragbolten safe?
- Can beginners hike Kjeragbolten?
- Is Kjeragbolten harder than Pulpit Rock?
- Can you hike Kjeragbolten in the rain?
- When is the best time to hike Kjeragbolten?
- Is Kjeragbolten worth it if you don’t stand on the boulder?
- Pin this post for later!
Kjeragbolten Hike at a Glance
Before getting into the details, here’s what you need to know about the Kjeragbolten hike:
- Trailhead: Øygardstøl/Kjerag parking area
- Distance: Around 11 km (7 miles) round trip
- Elevation gain: Around 750 meters (2,460 feet)
- Time: Around 5–6 hours for most hikers
- Difficulty: Challenging
- Trail type: Out and back
- Highest point: Around 1,100 meters (3,600 feet)
- Main challenge: Three steep climbs, with chains along some sections
- Parking: Paid parking is available at the trailhead
- Best time to hike: June through September, depending on snow and road conditions
The Kjeragbolten hike isn’t technically difficult for most experienced hikers, but it is physically demanding. You’ll climb and descend three separate mountains on the way to Kjerag, which means there are several steep sections in both directions.
For me, most of the hike was manageable. The sections I found genuinely difficult were the steep areas where you have to use chains, particularly when coming back down.
Where Is Kjeragbolten?
Kjeragbolten is located on Kjerag mountain above Lysefjord in southwestern Norway. The famous boulder is wedged in a crevice roughly 984 meters (3,228 feet) above the fjord.
The Kjeragbolten hike starts from Øygardstøl, near the small village of Lysebotn at the eastern end of Lysefjord.
If you’re also planning to hike Pulpit Rock while you’re in the area, keep in mind that the two trailheads are on different parts of Lysefjord. They might look relatively close on a map, but you shouldn’t plan your itinerary as though you can simply drive from one to the other in a few minutes.
How to Get to the Kjeragbolten Trailhead
The Kjeragbolten hike begins at the parking lot beside Øygardstøl, sometimes referred to as the Kjerag parking lot.
Driving is one of the easiest ways to get here, particularly if Kjeragbolten is part of a longer Norway road trip. The final approach takes you along the famous Lysevegen road, which twists its way through the mountains above Lysebotn.
If you’re staying in Stavanger without a car, there are also seasonal bus options specifically designed for hikers. Make sure you check the current schedule before your trip because transportation to Kjerag is seasonal and can change from year to year or you can also book a well rated tour like the one below.
One important thing to remember is that the mountain road to the trailhead closes during winter. Exactly when it opens each year depends on snow conditions, so don’t assume you’ll be able to access Kjerag simply because the weather is warm elsewhere in Norway.
What Is the Kjeragbolten Hike Actually Like?
One thing I didn’t fully appreciate before doing the Kjeragbolten hike is that you’re not simply climbing steadily to the top.
Instead, you have three major climbs.
You climb up, descend, climb again, descend again, and then tackle another climb before eventually reaching the plateau leading toward Kjeragbolten.
That makes the hike feel quite different from a trail where you gain most of your elevation on the way up and then enjoy a mostly downhill return.

The First Climb
The hike gets down to business almost immediately.
From the parking lot, you begin climbing steeply over exposed rock. There are chains installed along some of the steeper sections, which you can use for additional support.
Once you reach the top of the first climb, you’ll descend into a valley—which also means you know you’ll have to regain some of that elevation shortly afterward.


The Second Climb
You’ll then begin the second major ascent.
Again, expect steep rock and sections where chains are available to help you climb. If the rock is wet, these sections can become significantly more difficult because the smooth surface can be slippery.
After reaching the top, you descend once again before beginning the final major climb.


The Third Climb
The third climb brings you toward the Kjerag plateau.
By this point, you’ve already accumulated quite a bit of elevation, but once you finish the steep climbing sections, the character of the hike changes considerably.
You’ll continue across a much more open, rocky landscape toward Kjeragbolten. Follow the trail markers carefully, particularly if visibility is poor.
Eventually, you’ll reach the area overlooking Lysefjord and the famous boulder.
And yes! it really is just sitting there between two cliffs.


How Difficult Is the Kjeragbolten Hike?
I would classify the Kjeragbolten hike as challenging, but I don’t think you need to be an exceptionally advanced hiker to do it.
If you regularly hike and have a reasonable level of fitness, the distance itself probably won’t be the biggest problem.
The chains are what make this hike more challenging.
There are several steep slabs of exposed rock where chains have been installed to help you climb. In some places, you may find yourself pulling with your upper body while looking for enough grip with your feet.
I found the majority of the hike manageable, but the chained sections were considerably tougher than the rest of the trail.
Coming down can also be harder than going up. You need to control your descent while finding secure places for your feet, and you may need to turn toward the rock and use the chains rather than simply walking downhill.
If you’re uncomfortable with steep terrain or have never encountered chains on a hike before, allow yourself plenty of time through these sections.
You also shouldn’t underestimate how much harder the Kjeragbolten hike becomes when the rock is wet. Good hiking shoes with strong grip make a huge difference here.
How Long Does the Kjeragbolten Hike Take?
You should budget approximately 5–6 hours to complete the Kjeragbolten hike, although your actual hiking time will depend on your fitness, trail conditions and how long you spend at the boulder.
I reached Kjeragbolten in approximately 2 hours and 12 minutes, and my hike back took around 2 hours and 25 minutes.
Interestingly, I was slightly slower coming back even though there was less overall climbing. That’s largely because descending the steep chained sections requires more care. You can’t necessarily move quickly just because you’re heading downhill.
You’ll also want to factor in time at Kjeragbolten itself. If you want a photo standing on the boulder, you may have to wait, particularly on a busy summer day.
For planning purposes, I’d give yourself at least six hours rather than trying to squeeze the hike into a tight itinerary.
Stepping Onto Kjeragbolten
For many people, standing on Kjeragbolten is the entire reason for doing this hike.
There are no railings on the boulder, and the drop into the valley below is enormous.
You access Kjeragbolten from behind rather than jumping onto it. Even so, you need to decide for yourself whether you’re comfortable stepping out onto the rock.
You absolutely do not have to stand on Kjeragbolten to make the hike worthwhile. In fact, 45% of people who hike up don’t end up stepping on the rock.
The surrounding scenery is spectacular on its own, and reaching Kjerag is an accomplishment regardless of whether you step onto the boulder.
If you do decide to go out, take your time and don’t allow a line of people waiting behind you to make you feel rushed. This is not somewhere you want to lose your footing because you’re trying to get a photo quickly.


My Kjeragbolten Hike Experience
I left Stavanger at around 5:30 AM in the morning because I really wanted to beat the crowds. The drive was pretty uneventful until Lysevegen road. Not only was the road narrow and windy, it was also really foggy and I could barely see where I was going.
Once I got to the parking lot, I used the free restroom and then started the hike. The hike is steep right from the get go. I am not going to lie, I struggled a bit with the chains at first before 1. I hadn’t really done a lot of chain climbing before and 2. the chains and the granite rock were both wet. By the time I hit the second incline, I had gotten a bit more used to the chains.
I visited at the beginning of June and the trail has just opened but there was still a lot of snow on the ground in the last section after the rocky plateau. Once I got to the boulder there were not a lot of people so I decided to take a leap of faith on to it. Some people leapt on to it while others (me included) crawled.
The method is irrelevant. What is most important is that you do it with all the confidence in the world. Once you get to stepping on to the rock, hesitation can be almost dangerous. I am not at all afraid of heights so what was a bit scary for me was not really seeing the sheer drop, it was more losing my footing or balance and slipping. Because that happens to me all the time even on flat ground! Getting off the rock requires a bit more concentration than getting off so be careful!
It took me a bit longer to come down than to hike up. I didn’t love going down the cables but did it in 2 hours 25 minutes nevertheless.
I have hiked to Everest Base Camp and summitted Mount Kilimanjaro but Kjeragbolten was one of the most exciting hikes I have ever done! Post adventure adrenaline ran though my veins for days after!

What to Wear and Bring for the Kjeragbolten Hike
Weather in the Norwegian mountains can change quickly, so you should prepare for conditions to be very different at Kjerag than they were when you left your accommodation that morning.
At a minimum, I recommend bringing:
- Hiking shoes or boots with excellent grip
- Waterproof jacket
- An extra warm layer
- Gloves for the chains
- Water
- Lunch and snacks
- Sunscreen
- Sunglasses
- Small first-aid kit
- Fully charged phone
- Portable battery pack
Your footwear is particularly important. You’ll be walking over large sections of exposed rock, and some of the steepest parts of the Kjeragbolten hike require you to push against the rock while holding onto a chain.
I would avoid attempting this hike in shoes with poor traction.
Even if the forecast looks good, bring a waterproof layer. Mountain weather can change surprisingly quickly. Gloves are especially useful on the chains as they are wet and cold sometimes.
Best Time to Hike Kjeragbolten
The main hiking season for Kjeragbolten generally runs from June through September.
July and August give you the longest days and typically the most reliable access, but they’re also the busiest months.
June and September can be fantastic if you want fewer people, but conditions are less predictable. Snow can linger early in the season, while fresh snow and colder weather can arrive toward the end.
The road to the Kjerag trailhead is also seasonal and normally closes during winter because of snow.
Regardless of when you visit, check both the weather forecast and current trail conditions before starting the hike.
What Weather Do You Need for Kjeragbolten?
If you have flexibility in your itinerary, save the Kjeragbolten hike for a relatively clear, dry day.
You don’t necessarily need perfect blue skies, but rain makes the exposed rock much more slippery and can make the chained sections considerably harder.
Low cloud can also obscure the views over Lysefjord, which is a shame after putting in all that effort to get there.
Strong winds are another consideration, particularly once you reach the exposed plateau and Kjeragbolten itself.
If conditions look genuinely bad, this isn’t a hike I would force into your itinerary just because you only have one day available.
Tips for Hiking Kjeragbolten for the First Time
There are a few things I wish every first-time hiker knew before starting the Kjeragbolten hike.
- Start early. You’ll have more time to complete the hike without worrying about daylight or transportation schedules, and you may encounter fewer people at Kjeragbolten.
- Don’t judge the entire hike by the first climb. The trail is steep almost immediately, but the terrain changes throughout the hike.
- Expect to use your upper body. The chains aren’t just there for decoration. Depending on your height and comfort level, you may need to pull yourself upward in places.
- Take your time coming down. I actually took longer to return than I did to reach Kjeragbolten. The steep rock and chains require careful foot placement on the descent.
- Prioritize grip when choosing footwear. Wet rock can completely change the difficulty of this hike.
- Give yourself more time than you think you need. Even if you hike quickly, you’ll probably want time for photos, food and simply enjoying the views.
- Don’t feel pressured to stand on Kjeragbolten. You’ve still completed the Kjeragbolten hike whether you step onto the boulder or admire it from solid ground.


Is the Kjeragbolten Hike Worth It?
Absolutely!
Kjeragbolten gets most of the attention because of the famous boulder, but the hike itself is a huge part of the experience.
You’ll climb over enormous slabs of rock, cross mountain valleys and eventually emerge onto a dramatic plateau high above Lysefjord. The repeated climbs make you work for the views, but they also make reaching Kjerag feel much more rewarding.
I found most of the Kjeragbolten hike easier than I had expected, although the chained sections were definitely challenging.
If you enjoy hiking and you’re comfortable with steep terrain, I think Kjeragbolten deserves a spot on your Norway itinerary.
Kjeragbolten Hike FAQs
How long is the Kjeragbolten hike?
The Kjeragbolten hike is approximately 11 km (7 miles) round trip. You should allow around 5–6 hours to complete it, including some time at Kjeragbolten.
Is the Kjeragbolten hike difficult?
Yes. The Kjeragbolten hike is considered challenging because of the elevation gain, three major climbs and steep sections of exposed rock. Chains have been installed along some of the steepest sections to help you climb and descend.
Do you need to use chains on the Kjeragbolten hike?
There are chains along several steep sections of the trail. While exactly how much you rely on them will depend on your confidence and the conditions, I found the chains particularly useful but these were the hardest parts of the hike for me.
Do you have to stand on Kjeragbolten?
No. You can hike all the way to Kjeragbolten and enjoy the scenery without stepping onto the boulder. There are no railings on Kjeragbolten, so only step onto it if you genuinely feel comfortable doing so.
Is Kjeragbolten safe?
Thousands of people complete the Kjeragbolten hike, but the trail includes steep and exposed terrain that you should take seriously. Wear appropriate footwear, check the weather before setting out and be particularly cautious if the rock is wet.
Can beginners hike Kjeragbolten?
A fit beginner with some hiking experience may be able to complete the Kjeragbolten hike, but I wouldn’t recommend making this your first-ever mountain hike. You should be comfortable hiking for several hours and navigating steep terrain.
Is Kjeragbolten harder than Pulpit Rock?
Yes. Kjeragbolten is considerably more demanding than Pulpit Rock. The Kjeragbolten hike is longer, has more elevation gain and includes steep rock sections with chains. If you’re deciding which one to attempt based purely on difficulty, Pulpit Rock is the easier hike.
Can you hike Kjeragbolten in the rain?
Technically you may be able to hike in light rain, but I wouldn’t choose a rainy day for Kjeragbolten if you have another option. The trail crosses large areas of exposed rock that can become slippery when wet, particularly around the steep chained sections. I especially wouldn’t step on the rock if it’s raining and/or windy.
When is the best time to hike Kjeragbolten?
June through September is generally the best time for the Kjeragbolten hike. July and August usually offer the most reliable access, while June and September can be quieter but have a greater chance of snow or difficult weather conditions.
Is Kjeragbolten worth it if you don’t stand on the boulder?
Definitely. Standing on Kjeragbolten is only one small part of the experience. The mountain scenery and views over Lysefjord make the hike worthwhile even if you have absolutely no intention of stepping onto the boulder.
Did you find this post useful? Please let me know by liking/commenting below or sharing this post on social media! Thank you!!
Pin this post for later!

See all my posts on Norway HERE


2 comments
This is such an incredible, world-class experience, and those dramatic fjord views are well worth a hike. Thanks for sharing, and have a good day 🙂 Aiva xx
Thank you so much Aiva! It was one of the best hikes I’ve done for sure!